
前回の記事では、 Base Templates and Blocks を使ってみました。 今回は、 Homepage Templates を使ってみます。
最初に、この記事の通り、サイトとテーマの骨組みを作成しておきます。
環境
- Hugo Static Site Generator v0.31.1
Homepage Templates
Homepage Template
The homepage of a website is often formatted differently than the other pages. For this reason, Hugo makes it easy for you to define your new site’s homepage as a unique template.
Homepage is a Page and therefore has all the page variables and site variables available for use.
サイトのトップのページはその他のページと違うレイアウトだったりしますよね。 そのためのテンプレートのようです。
baseof.html
前回の記事と同じですが、基本となるレイアウトを作成しておきます。
次のファイル (themes/<THEME>/layouts/_default/baseof.html) を作成しました。
<!DOCTYPE html>
<html>
  <head>
    <meta charset="utf-8">
    <title>
      {{ block "title" . }}
        {{/* <!-- Blocks may include default content. --> */}}
        {{ .Site.Title }}
      {{ end }}
    </title>
  </head>
  <body>
    <!-- Code that all your templates share, like a header -->
    {{ block "main" . }}
      <!-- The part of the page that begins to differ between templates -->
    {{ end }}
    {{ block "footer" . }}
      <!-- More shared code, perhaps a footer but that can be overridden if need be in  -->
    {{ end }}
  </body>
</html>
index.html
サイトのトップのレイアウト (theme/<THEME>/layout/index.html) を次のように作成しました。
{{ define "main" }}
  <main aria-role="main">
    <header class="homepage-header">
      <h1>{{ .Title }}</h1>
      {{ with .Params.subtitle }}
        <span class="subtitle">{{ . }}</span>
      {{ end }}
    </header>
    <div class="homepage-content">
      <!-- Note that the content for index.html, as a sort of list page, will pull from content/_index.md -->
      {{ .Content }}
    </div>
    <div>
      <!-- Note that .Data.Pages is the equivalent of .Site.Pages on the homepage template. -->
      {{ range first 10 .Data.Pages }}
        {{ .Render "summary" }}
      {{ end }}
    </div>
  </main>
{{ end }}
baseof.html の {{ block "main" }} を実装(オーバーライド)しています。
ここでやっていることは次の内容です。
- タイトルとサブタイトルの表示
- content/_index.md のコンテンツの表示
- 最新の 10 記事の要約の表示
content/_index.md
content/_index.md ファイルを次のように作成しました。
---
title: Homepage Templates
subtitle: Hugo is Absurdly Fast!
date: 2018-03-28T17:47:27+09:00
---

## Homepage Templates の見出し

theme/<THEME>/layout/index.html の `{{ .Content }}` の箇所がこの記事 (content/_index.md) の内容に置き換えられます。
レイアウト (index.html) の {{ with .Params.subtitle }}...{{ end }} の箇所がこのファイル (content/_index.md) の subtitle: Hugo is Absurdly Fast! の内容に置き換えらて、 HTML が生成されるようです。
それから、レイアウトの {{ .Content }} の箇所がこのファイルの内容に置き換えられて、 HTML が生成されるようです。
このファイルはテーマのファイルではなく、サイトのファイルです。 テーマの利用者が、サイトのトップのページにコンテンツを表示したければファイルを作成すればいいだけですし、表示したくなければファイルを作成しなければいいだけです。
以前からこの仕組みはあったのかな? テーマに手を入れることなく、利用者が内容を変えられるので、便利な仕組みだと思いました。
summary.html
Content View Templates
Hugo can render alternative views of your content, which is especially useful in list and summary views.
These alternative content views are especially useful in list templates.
index.html ファイルには、記事の要約を表示するために、 {{ .Render "summary" }} という記述がありました。
これは、 Content View Templates を使っているようです。
Content View Templates というのは1つの記事をどう表示するか、を決めるレイアウトのようです。
List Page Template からは、記事のタイトルだけを表示する場合もあるでしょうし、記事の要約だけを表示する場合もあるでしょうし。
Single Page Templates からは、記事の全文を表示するでしょうし。
そういったものを Content View Templates と呼んでいるようです。
そのために、もう一つ、レイアウトのファイル (summary.html) を作成します。 今回は、一番優先度の低い、基本となるファイル (theme/<THEME>/layouts/_default/summary.html) を作成します。
Content View Templates | Hugo を参考に次のファイル (summary.html) を作成しました。
<article class="post">
  <header>
    <h2><a href='{{ .Permalink }}'>{{ .Title }}</a></h2>
    <div class="post-meta">{{ .Date.Format "Mon, Jan 2, 2006" }} - {{ .FuzzyWordCount }} Words</div>
  </header>
  {{ .Summary }}
  <footer>
    <a href='{{ .Permalink }}'><nobr>Read more →</nobr></a>
  </footer>
</article>
このレイアウトファイルでは次のことをしているようです。
- タイトルと記事へのリンクを表示
- 記事の日付と記事内のおおよその単語の数を表示
- 記事の要約を表示
- Read more のリンクを表示
Hugo-defined: Automatic Summary Splitting
By default, Hugo automatically takes the first 70 words of your content as its summary and stores it into the .Summary page variable for use in your templates. Taking the Hugo-defined approach to summaries may save time, but it has pros and cons:
User-defined: Manual Summary Splitting
Alternatively, you may add the summary divider where you want to split the article. For org content, use # more where you want to split the article. Content that comes before the summary divider will be used as that content’s summary and stored in the .Summary page variable with all HTML formatting intact.
Hugo のデフォルトは、記事の最初の 70 語を要約としているようです。
記事の Markdown のファイルに <!--more--> と記述することで、明示的にそれ以前を要約として表示することができるようです。
content
content/post ディレクトリーに次の 2 つの examples の記事を作成しました。
- hello-hugo.md
- another-post.md
次のコマンドでダウンロードしました。
$ install -d content/post
$ curl -L -o content/post/hello-hugo.md 'https://raw.githubusercontent.com/gohugoio/hugo/master/examples/blog/content/post/hello-hugo.md'
$ curl -L -o content/post/another-post.md 'https://raw.githubusercontent.com/gohugoio/hugo/master/examples/blog/content/post/another-post.md'
Hugo のサーバーで確認
Hugo のサーバーで確認するために次のコマンドを入力します。
$ hugo -t <THEMENAME> server
http://localhost:1313/ にアクセスします。
すると、 baseof.html と index.html が適用されたページが表示されます。
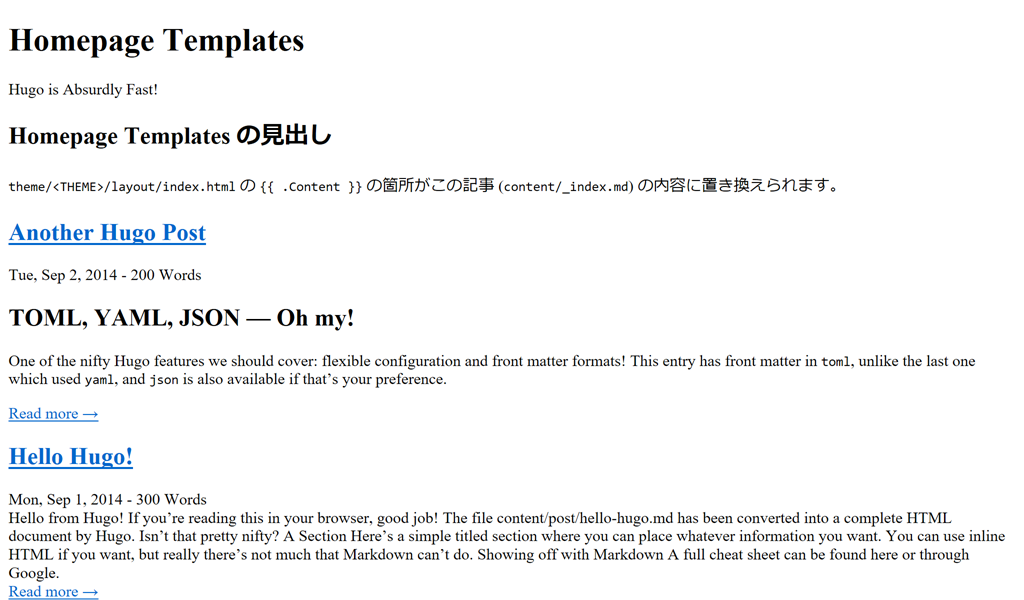
次の内容が表示されていると思います。
- タイトルとサブタイトル
- content/_index.md のコンテンツ
- 最新の 10 記事の要約
Variables and Params
書いておくのを忘れてました。
Hugo のテーマを作成するに当たって、 {{ .Title }} のような記述をします。
これは Hugo の変数とパラメータ-で、次のページに説明がありました。
たくさんあるので、都度、必要なものを調べて記述しています。
終わり
今回は、ここまでにします。
参考
7 April 2018 追記
次の記事を書きました。